CICD-to-GPU-Projects
Project Description
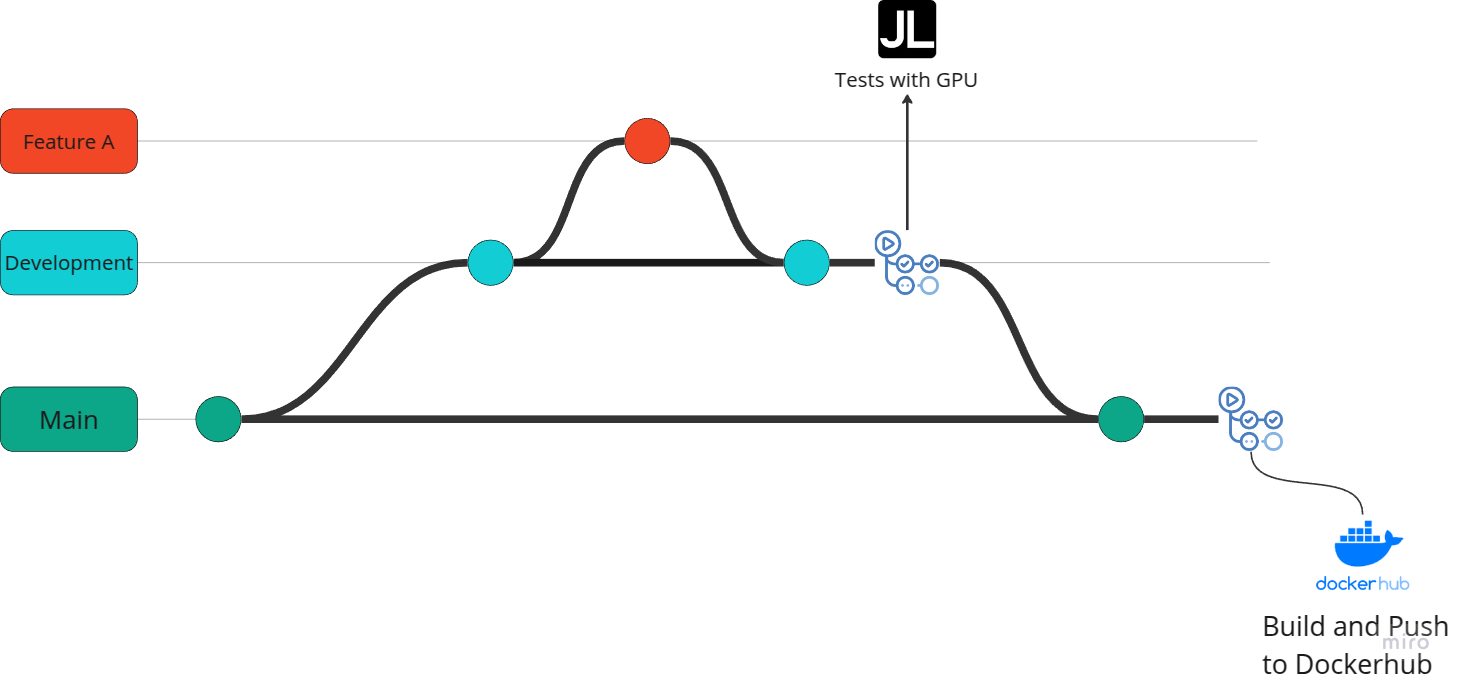
This project offers a CI/CD pipeline template specifically designed for projects that require the use of GPUs. While GitHub Actions provides a robust framework for managing continuous integration and delivery workflows, it lacks native solutions for tasks requiring accelerated graphical processing. This template integrates self-hosted runners in the Jarvis cloud, allowing users to leverage GPU resources.
For use in other cloud services, the implementation would be similar. The diagram below displays the pipeline layout.
Installation of the Self-Hosted Runner on Jarvis
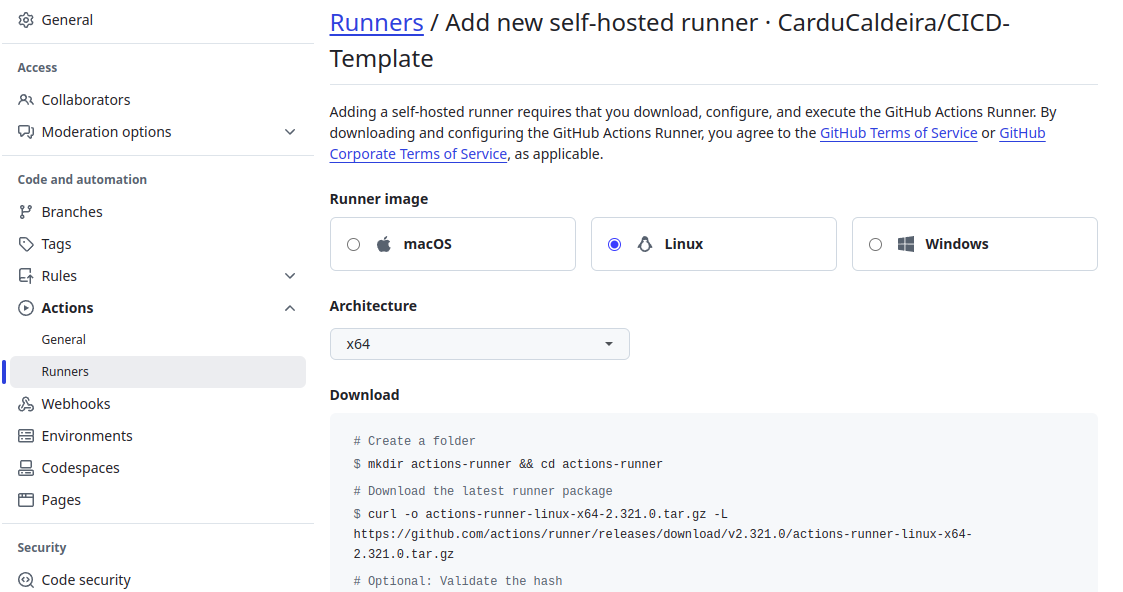
To use GitHub Actions self-hosted runners, installation in the GPU environment is required, which in this case is a Jarvis instance. The installation can be done following the official documentation.
A shell script (scripts_jarvis/construct_env.sh) was implemented to automate the installation and enable proper environment configuration for the runner installation. Since the runner must be executed as a non-root user, it was necessary to create a user and grant permissions for folder usage (this step is necessary due to Jarvis limitations):
/home/.local/share/: Python package management is done through the uv tool. With uv, you can install a specific version of the Python interpreter. The binary is saved in /home/.local/share/uv/python.
/home/.cache: The cache for Python library downloads is saved in this folder.
/home/$USER: Needed for uv to create the virtual environment (.venv) with the installed libraries.
In the script, fields marked with *** should be replaced with the fields provided for your runner as specified by GitHub Actions.
Pipeline Stages
Since the main branch has been blocked from direct pushes, pushing can only occur via pull requests from auxiliary branches such as development. Once a pull request to main is triggered, the pipeline (executed in .github/workflows/development.yml) will consist of the following stages:
Initialization of the pre-configured instance. The initiation is carried out by the apiclient.py script, which connects to the Jarvis API and starts the instance. Upon starting the instance, the scripts_jarvis/start_runner.sh script is executed on the instance, recreating the user (as the instance does not persist outside of /home, the user created during environment setup is lost though the folders persist) and executes the runner. To execute the start_runner.sh script on Jarvis, the script must be previously uploaded in the user configurations of Jarvis.
Testing/Execution in the self-hosted environment.
Pausing the instance is done through the apiclient.py script.
In some rare cases, it was observed that the test stage in the self-hosted environment remained in a queued state, waiting for the runner to accept the job. To address this, an auxiliary pipeline was implemented in .github/workflows/timeout.yml, which, after a specified time, checks if there are jobs in a queued state and cancels the workflow if so. This solution was based on the discussion at https://github.com/orgs/community/discussions/50926 since the timeout-minutes configuration does not apply to jobs in a queued state.
Additionally, although the GitHub Actions marketplace offers a job that installs uv, the job for installing uv in the self-hosted environment was implemented due to pre-existing configurations on the Jarvis instance, which installs uv via Miniconda. Due to non-root user permission limitations, the best approach was to install uv directly.
To implement the pipeline, it's necessary to configure the following in GitHub Actions:
Secret TOKEN_JARVIS: Used by apiclient.py to connect to Jarvis.
Variable INSTANCE_NAME: The name of the Jarvis instance that apiclient.py will start/pause.
Variable SCRIPT_NAME: The name given to the script uploaded from scripts_jarvis/start_runner.sh in the Jarvis settings. This script name is required to specify that it should be executed to start the runner.
Variable SLEEP_DURATION: The waiting time for the timeout.yml workflow to check if there are any jobs in a queued state.
Variable WORKFLOW_NAME: The name of the workflow that timeout.yml will monitor to see if there is a job in a queued state.
Cloud Jarvis
In the Python script apiclient.py, a connection to the Jarvis API is established. For more details, please refer to the documentation at Jarvis Labs Documentation and the Repository.
Tools Used: UV and MKDOCS
UV
UV is used for package and project management. Below are some commands and their purposes:
-
uv python install < version > (e.g., 3.12): UV manages Python versions. This command downloads and installs the specified Python version's interpreter. By default, the interpreter is stored in ~/.local/share/uv/python/. If an interpreter for the specified version already exists (e.g., in /usr/bin/python3.12), it will use the available interpreter.
-
uv run: To run a script in the developed environment. To execute using Python, activate the virtual environment with source .venv/bin/activate.
-
uv add: Installs a library and updates pyproject.toml, .venv, and uv.lock. To install a library in a specific group:
- uv add --group lint ruff: Installs the library in the 'lint' group.
- uv add --dev pytest is equivalent to uv add --group dev pytest.
-
uv sync: Installs the project libraries specified in pyproject.toml and updates uv.lock. For cases where uv.lock is pre-generated or doesn't need updating, use uv sync --frozen to install libraries without regenerating uv.lock.
-
uv export --only-group doc > requirements.txt: Exports only a specific group of dependencies (e.g., 'doc') to a .txt file.
In this project, the environment variable UV_COMPILE_BYTECODE=1 was used. This setting tells UV to create bytecode files for Python scripts, which enhances performance in subsequent executions of those scripts.
MKDOCS
The project documentation is carried out using MkDocs, generating a static site. For deploying the page through GitHub Actions, run the following command locally:
uv run mkdocs gh-deploy
It is also necessary to configure the branch that GitHub Pages will use to generate the site.
The documentation generated by MkDocs can be viewed at https://carducaldeira.github.io/GPU-CICD-Pipeline-Template/.
Docker
After executing a pull request to the main branch, a Docker image is built with PyTorch and CUDA drivers. For this process, besides using the base Ubuntu image, NVIDIA images with pre-installed CUDA drivers were tested (https://hub.docker.com/r/nvidia/cuda/tags). However, it was observed that after installing PyTorch, the image exceeded 8GB (compared to the official PyTorch image, which is around 6GB, depending on the version, once decompressed), due to CUDA installation by PyTorch, leading to unnecessary duplication of some files.
The multi-stage build approach taken is inspired by the PyTorch runtime image, constructed using a multi-stage build as seen in the PyTorch Dockerfile. The key variation in this project is replacing Miniconda (used to install PyTorch in the base Ubuntu image) with UV, eliminating the need to install ccache and cmake packages required for Miniconda.
This project's Dockerfile follows a multi-stage build structure. In this pipeline, the build occurs after testing; however, depending on the context, conducting the build before testing can be advantageous, as shown in this YouTube Tutorial. This would necessitate an additional build stage to create a testing environment with the required configurations.
To optimize the Docker image build process, two caching strategies were employed: cache mount and cache registry Docker Documentation . The cache mount strategy was implemented, resulting in a significant reduction in build time. The cache registry strategy was not adopted due to GitHub Actions' space limitations, in this Issue it is discussed about this.
The builds resulted in two images available at https://hub.docker.com/repository/docker/carloscaldeira/pytorch/general.
These images pertain to two environments: the development environment includes PyTorch and CUDA, as well as the UV Python package installer. The second image excludes UV, retaining only the pre-installed Python packages to reduce its size, demonstrating how a runtime image could be generated from the development image in a CI/CD pipeline. To install additional libraries beyond PyTorch with CUDA, you can base your Dockerfile on the development image:
FROM carloscaldeira/pytorch:2.5.1-cuda12.4-uv-development
Although the image provided in this pipeline is smaller than the official PyTorch image, some Docker images are specifically optimized for this purpose. For such optimization goals, consider exploring the use of Chainguard images.
The primary focus of this project is developing the CI/CD template itself. However, one of its future goals is to enhance the continuous delivery pipeline to allow creating Docker images for various combinations of PyTorch and CUDA versions.
Folder Structure
Below is the project's folder structure:
├── apiclient.py
├── requirements_jarvis.txt
├── Dockerfile
├── pyproject.toml
├── uv.lock
├── README.md
├── src
│   └── main.py
├── tests
│   └── pytorch_test.py
├── mkdocs.yml
├── docs
├── .githooks
│   └── pre-commit
└── .github
    └── workflows
        ├── development.yml
        ├── cd.yml
        └── timeout.yml
-
apiclient.py: Python script used to start/stop an instance in Jarvis.
-
requirements_jarvis.txt: Libraries used to set up the environment for using the apiclient.py script.
-
scripts_jarvis: Shell scripts used to configure and start the instance in Jarvis.
-
.github/workflows: Pipeline implementation scripts.
-
.githooks: A pre-commit configured locally to prevent commits to the main branch.
-
src/main.py: Example Python script.
-
tests/: Test folder.
-
docs: Folder containing files used to generate the project's documentation.
-
mkdocs.yml: MkDocs configuration file.
-
Dockerfile: Dockerfile used to build the image with CUDA and PyTorch.